Mastering the Cut Crease: Your Ultimate Tutorial for a Dramatic Eye Look
Mastering the cut crease is a transformative makeup technique which enhances your eyes, creating depth and drama. This detailed tutorial guides you through each step, ensuring a flawless, professional-looking result, even for beginners.
Ready to elevate your eye makeup game? The cut crease is a technique that’s all about creating definition and drama, and it’s more accessible than you might think.
This detailed guide will walk you through **mastering the cut crease**: A detailed tutorial for a dramatic eye look, step by step, ensuring you achieve a stunning, professional finish. Let’s get started!
What is a Cut Crease and Why Should You Master It?
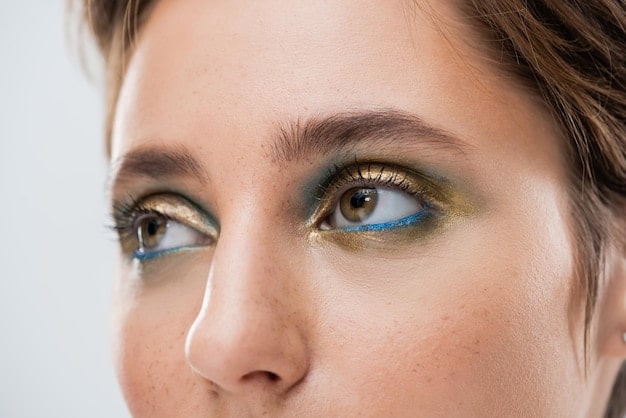
The cut crease is a makeup technique where a defined line is created in the crease of the eye, separating the lid color from the brow bone highlight. It’s perfect for making eyes appear larger and more defined. But why specifically should you try and master the cut crease: A detailed tutorial for a dramatic eye look?
Why Master the Cut Crease?
It’s not just about looking good; it’s about understanding makeup techniques and how they work. Mastering this technique will give you a better understanding of eye anatomy and how different products interact with each other. This could open a whole new range of eye makeup looks and techniques for you to explore in the future.
Benefits of a Well-Executed Cut Crease
A well-executed cut crease can completely transform your eye makeup, adding depth and definition that enhances your natural features. It’s also versatile; you can adapt the technique to suit different styles and occasions.
- Makes eyes appear larger and more defined
- Adds depth and dimension to the eye
- Versatile for different makeup styles (classic, modern, dramatic)
- Allows for creative color combinations
In essence, understanding the foundational principals of a cut crease provides a perfect baseline allowing you to then explore the vast ranges of eye makeup from neutral daytime looks to colourful party makeup.
Essential Tools and Products for Mastering the Cut Crease
Having the right tools and products is crucial for achieving a flawless cut crease. While practice makes perfect, the right tools and equipment for sure do help! Here are some essentials you’ll need:
Must-Have Brushes
Different brushes serve different purposes in creating a cut crease. Having the right brushes will make the process smoother and more precise.
- Blending Brush: For seamlessly blending eyeshadow.
- Small, Dense Brush: For precise application of color in the crease.
- Flat Brush: For packing color onto the eyelid.
- Pencil Brush: For detailed work and smudging.
Key Makeup Products
Of course the most important peice to the puzzle for most looks; having the right makeup can make all the difference and provide long last results. With eye makeup it is crucial to have high quality pigments and the ability blend product well!
- Eyeshadow Primer: To create a smooth base and prevent creasing.
- Matte Eyeshadows: Essential for creating the crease and adding depth.
- Shimmer/Satin Eyeshadows: To highlight the lid and add dimension.
- Concealer/Cut Crease Base: For defining the cut crease line.

With the right products and techniques, you will almost certainly be on your way to mastering the cut crease. A detailed tutorial for a dramatic eye look will show you the correct order of application now. It’s important to ensure your brushes are clean and of decent quality. Investing in high quality tools will only enhance the longevity and performance of your eye makeup!
Step-by-Step Tutorial: Achieving the Perfect Cut Crease
Now, let’s dive into the step-by-step process of creating a stunning cut crease. This tutorial is designed to be easy to follow, even if you’re a beginner.
Step 1: Prime Your Lids
Start with a clean, primed canvas. Apply a thin layer of eyeshadow primer to your eyelids to create a smooth base and prevent creasing. Priming is important as it provides a even surface for your products to sit and allow the colours to become more vibrant.
Step 2: Apply Transition Shade
Using a blending brush, apply a matte transition shade to your crease. This will help blend the darker colors later and create a seamless transition. The transition shade should be a warm toned brown that is not too dark or too light. This will enable you to blend seamlessly with bolder colours or more neutral ones.
Step 3: Define the Crease
Take a small, dense brush and apply a darker matte eyeshadow to define the crease. Follow the natural shape of your eye socket, starting from the outer corner and working inwards. This step is crucial for **mastering the cut crease**: A detailed tutorial for a dramatic eye look! It forms the basis of the whole desired look.
Step 4: Cut the Crease
Using a flat brush and concealer or a cut crease base, carefully carve out the crease line. Start from the inner corner and follow the shape of your eye, creating a sharp, defined line. This is where precision is key, and patience is key! Ensure you are not cutting too high, as this may result in a clown like look.
Step 5: Pack Color onto the Lid
Apply a shimmer or satin eyeshadow to the lid, staying within the cut crease line. This will make your eyes pop and add dimension. By adding lighter colours to the lid, it will make these areas appear larger, further emphasizing the shape of your eyes!
Step 6: Blend and Perfect
Use a blending brush to soften any harsh lines and blend the edges of the cut crease. This will ensure a seamless, professional finish. Even the best makeup artist requires a touch up, so do not feel defeated if you need to refine and perfect the eye makeup.
Step 7: Final Touches
Finish with eyeliner, mascara, and false lashes (optional) to complete the look. After all the precision of the eye makeup, it is a shame to finish half heartedly! Mascara allows the lashes to blend into the eye makeup, softening the bold lines that have been drawn and creating a more seamless desired look.
Tips and Tricks for Mastering the Cut Crease
Mastering the cut crease isn’t just about following steps; it’s also about understanding the nuances and tricks that can make your application smoother and more effective.
Choosing the Right Colors
Experiment with different color combinations to find what best suits your eye color and skin tone. Neutral tones are great for everyday looks, while bold colors can make a statement. Different pigments work for skin tones. For example, darker skin tones, are able to pull off more vibrant colours than paler ones.
Working with Different Eye Shapes
Adapt the cut crease technique to suit your eye shape. Hooded eyes may require a higher crease line, while close-set eyes can benefit from a lighter inner corner highlight. If you have deep set eyes, you will need to find a method that accentuates and brings forth the eyes so they appear larger.
Common Mistakes to Avoid
A lot of people starting out with trying the cut crease are guilty of making some mistakes, which of course is fine, as nobody begins perfect. However there are some key mistakes to avoid when doing the cut crease!
- Harsh Lines: Always blend the edges to avoid a stark, unnatural look.
- Uneven Crease: Pay attention to symmetry and ensure both eyes are even.
- Too Much Product: Start with a little and build up to avoid a cakey finish.
Remember, practice makes perfect. But what else can you start doing in order to work towards mastering the cut crease? A detailed tutorial for a dramatic eye look could benefit from tips like blending techniques. It is important to use soft brushes that disperse pigment in a feather like motion, rather than hard brushes.
Adapting the Cut Crease for Different Occasions
One of the beautiful things about the cut crease is its adaptability. You can modify it to suit a wide range of occasions, from casual daytime events to glamorous nights out.
Daytime Cut Crease
For a daytime look, opt for softer, neutral tones. A subtle cut crease with warm browns and a touch of shimmer can enhance your eyes without being too overwhelming. The best eye makeup for everyday should look natural and subtle.
Evening Cut Crease
For evening events, go bold with deeper, more dramatic colors. A smoky cut crease with black and metallic shades can make a striking statement. The more dramatic the better! Parties and events allow you to use a whole variety of eye looks, so be creative and explorative.
Special Occasions
For special occasions like weddings or parties, consider adding embellishments like glitter or rhinestones to your cut crease. This will add a touch of glamour and make your eyes sparkle. When aiming for mastering the cut crease: A detailed tutorial for a dramatic eye look, and knowing the different nuances surrounding the eye makeup will assist you in exploring various makeup themes.
Advanced Techniques and Variations
Once you’ve mastered the basic cut crease, you can start experimenting with advanced techniques and variations to create unique and stunning looks.
Halo Eye
The halo eye involves placing a shimmer shade in the center of the lid and blending darker colors on the inner and outer corners. This creates a spotlight effect that makes the eyes appear rounder and more open. It works well for individuals with deep set eyes as it will emphasize them.
Reverse Cut Crease
A reverse cut crease involves placing the darker color on the lid and highlighting the crease line with a lighter shade. This creates a bold, edgy look that’s perfect for nights out. This style allows for more unique colours to be used, as it draws emphasis away from the transition between the lid and the crease and puts it directly onto the colour on the lid.
Floating Crease
A floating crease involves creating a defined line above the natural crease, giving the illusion of larger, more lifted eyes. This technique is great for those with hooded eyes or smaller eye shapes. For this technique to be effective, you must use neutral shades or shades darker than your skin with bold shapes.
| Key Points | Brief Description |
|---|---|
| 🎨 Priming Lids | Creates a smooth base for eyeshadow application. |
| 🖌️ Defining Crease | Use a dark matte eyeshadow to create depth. |
| ✨ Cutting Crease | Carve out crease line with concealer for a defined look. |
| 🌈 Color on Lid | Apply shimmer to lid. |
Frequently Asked Questions
Use a soft, fluffy blending brush in windshield wiper motions to soften any harsh lines. Start with a light hand and gradually build up the intensity. Proper blending is key to **mastering the cut crease**: A detailed tutorial for a dramatic eye look needs perfectly blended eyeshadows to fully complete the look
For fair skin, opt for soft, neutral tones like peaches and browns. Medium skin tones can wear warmer shades like golds and bronzes. Dark skin tones can pull off rich, vibrant colors like blues and purples. Experiment to find what you love!
Yes, but keep it subtle. Use neutral colors and a soft, diffused line for a more natural look. The purpose of mastering the cut crease: A detailed tutorial for a dramatic eye look, is to be able to explore the various different eye makeup styles, for both special and casual occasions
Don’t worry! Use a cotton swab dipped in makeup remover to clean up any errors. Then, reapply the concealer or cut crease base and continue with your look. Everyone makes mistakes when it comes to makeup!
Start with a good eyeshadow primer, set your eyeshadow with a setting spray, and avoid touching your eyes throughout the day. Quality makeup is also essential to ensure it latsts the distance. A well-prepared base is also essential to increase and enhance the longevity of an eye makeup look
Conclusion
Mastering the cut crease: A detailed tutorial for a dramatic eye look is an art form, but with the right tools, techniques, and a little practice, anyone can achieve a stunning, professional finish. Don’t be afraid to experiment with different colors and styles to find what works best for you.
So, grab your brushes and eyeshadows, and start creating your own unique cut crease looks today. With dedication and patience, you’ll be turning heads with your stunning eye makeup in no time!


