Contour Like a Pro: 5 Easy Steps to Face Sculpting
Contour Like a Pro: Sculpting Your Face for a Defined Look in 5 Easy Steps involves strategically applying dark shades to create shadows and light shades to highlight features, adding dimension and definition to your face. This makeup technique can enhance cheekbones, slim the nose, and define the jawline.
Do you ever look at celebrities and wonder how they achieve that perfectly sculpted face? The secret often lies in the art of contouring. Contour Like a Pro: Sculpting Your Face for a Defined Look in 5 Easy Steps might sound intimidating, but it’s a lot easier than you think. With the right techniques and products, you can enhance your natural features and achieve a flawless, defined look.
Ready to learn how to contour like a pro? Let’s dive into a simple, step-by-step guide that will help you master the basics and confidently sculpt your face. This guide will explain how to Contour Like a Pro: Sculpting Your Face for a Defined Look in 5 Easy Steps.
Understanding the Basics of Contouring: Contour Like a Pro: Sculpting Your Face for a Defined Look in 5 Easy Steps
Before we get into the steps, it’s essential to understand the principles behind contouring. Contouring is all about creating shadows and highlights to define and reshape your face. Dark shades recede areas, while light shades bring features forward. Mastering these techniques will help you Contour Like a Pro: Sculpting Your Face for a Defined Look in 5 Easy Steps.
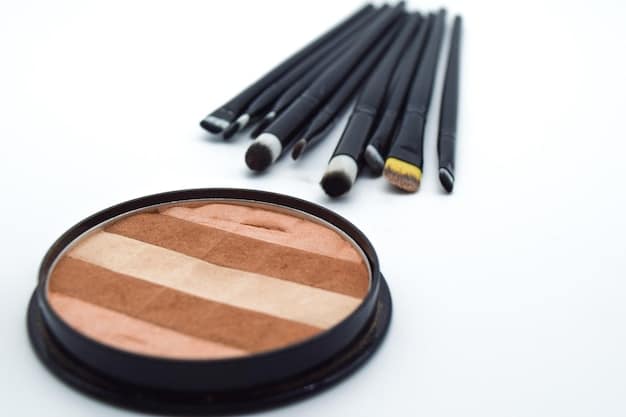
Choosing the Right Products for Contouring
Selecting the right products is key to achieving a natural and seamless contour. Here are some options to consider:
- Powder Contour: Ideal for beginners, powder contours are easy to blend and build. Look for matte shades that are 1-2 shades darker than your skin tone.
- Cream Contour: Cream contours provide a more intense and long-lasting finish. They are great for dry skin and creating a defined look.
- Contour Sticks: These offer precise application and are perfect for on-the-go touch-ups. They work well for all skin types.
To Contour Like a Pro: Sculpting Your Face for a Defined Look in 5 Easy Steps, it’s also necessary to find the correct tools. Brushes with an angled shape are perfect for applying the product under cheekbones, on the temples, and along the jawline.
Selecting the right products starts with understanding your skin type. For example, oily skin might benefit more from powder products, whereas drier skin types are better suited for cream based contour makeup. Also consider shades. For light skin tones, opt for lighter shades of brown and taupe colors. For more olive or tan skin tones, try colors like caramel or deep beige.
Step-by-Step Guide to Face Sculpting
Now that you have the right products, let’s get into the step-by-step guide on how to Contour Like a Pro: Sculpting Your Face for a Defined Look in 5 Easy Steps. This process is designed to be simple and effective, perfect for achieving a professional-looking contour at home.
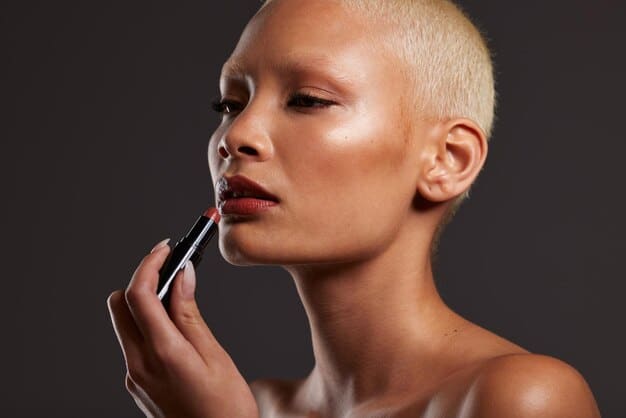
Step 1: Prep Your Skin and Apply Foundation
Start with a clean, moisturized face. Apply your regular foundation and concealer to create a smooth base. This ensures that the contour blends seamlessly and looks natural. Applying foundation also helps the contour makeup last longer, particularly for cream foundations.
Step 2: Apply Contour Under Your Cheekbones
Locate your cheekbones by feeling for the hollows beneath them. Use an angled brush to apply the contour product in a diagonal line from the ear towards the corner of your mouth. Blend well to soften any harsh lines. Remember, the goal is to create a subtle shadow that adds depth to your face. The point of making sure this area is thoroughly blended is so that the makeup looks natural and so the application doesn’t look blocky.
Step 3: Contour Your Temples and Forehead
Apply a small amount of contour along your temples, near your hairline. This helps to narrow your forehead and create a more balanced look. Blend the product into your hairline to avoid any noticeable lines. This step is especially helpful if you have a wider forehead. This can also help to shorten the area of your forehead if that is your goal (particularly if you have a larger forehead).
Step 4: Define Your Jawline
To define your jawline, apply contour along the underside of your jaw, starting from your ear and moving towards your chin. This creates the illusion of a more sculpted and defined jaw. Blend the product downwards into your neck for a seamless transition and remember to use a light hand for a natural, soft look as you Contour Like a Pro: Sculpting Your Face for a Defined Look in 5 Easy Steps. This step is critical to pulling together the entire contour makeup look.
Step 5: Highlight to Enhance
Apply highlighter to the high points of your face, such as your cheekbones, brow bone, and the bridge of your nose. This will bring these areas forward and enhance your sculpted look. Use a light hand and blend well for a natural, glowing finish. A little bit of highlight will go a long way, so start with a small amount and build up as needed to Contour Like a Pro: Sculpting Your Face for a Defined Look in 5 Easy Steps.
Contouring takes practice and patience to master. Use these five steps as a guide for your face sculpting techniques.
Essential Tips for Perfect Contouring
To Contour Like a Pro: Sculpting Your Face for a Defined Look in 5 Easy Steps successfully, consider these additional tips. These suggestions ensure a flawless, natural finish every time.
- Blend, Blend, Blend: The key to a natural contour is seamless blending. Use a fluffy brush to blend the edges of your contour product until there are no harsh lines.
- Use a Light Hand: Start with a small amount of product and build up as needed. It’s easier to add more product than to remove too much.
- Consider Your Face Shape: Different face shapes require different contouring techniques. Research the best methods for your specific face shape to achieve the most flattering results.
Understanding Different Face Shapes
Contouring isn’t a one-size-fits-all technique. Depending on your face shape, there are specific approaches to enhance your features effectively. Round faces may benefit from more angular contouring, while square faces might need softer lines to soften the edges.
Choosing the Right Shade
Selecting the right contour shade is crucial for a natural look. Choose a shade that is only one or two shades darker than your skin tone. A shade that is too dark can look harsh and unnatural, while a shade that is too light won’t create enough of a shadow effect.
Common Mistakes to Avoid
While mastering contouring, it’s easy to make common mistakes. Avoiding these pitfalls will help you Contour Like a Pro: Sculpting Your Face for a Defined Look in 5 Easy Steps. These errors can result in unnatural lines and uneven blending.
- Using the Wrong Shade: As mentioned earlier, using a contour shade that is too dark can create a harsh, unnatural look. Always opt for a shade that is close to your natural skin tone.
- Applying Too Much Product: Over-application is a common mistake that can make your contour look heavy and unnatural. Start with a small amount of product and build up gradually.
- Forgetting to Blend: Not blending your contour properly can result in harsh lines and an uneven finish. Always take the time to blend your contour seamlessly into your skin.
Pay attention to the shades you are using for both contour and highlight. A general rule of thumb is that contour should be shades darker than your skin tone, while highlighter should be a shade or two lighter than your skin tone.
Another mistake to avoid is using shimmer or glitter in your contour products. Contour makeup should strictly be matte so that shadows can be created on the face (not sparkles!).

Advanced Contouring Techniques to Try
Once you’ve mastered the basics, you can explore advanced contouring techniques. These methods can enhance your skills and create more customized looks. Consider these ideas to further refine your technique and Contour Like a Pro: Sculpting Your Face for a Defined Look in 5 Easy Steps.
Contouring with Different Products
Experiment with using different types of products for contouring. Cream contours can provide a more intense and buildable finish, while powder contours are great for a natural, everyday look. Try using a combination of both for a customized effect.
Highlighting Different Areas
Highlighting isn’t just for your cheekbones and nose. You can also highlight your cupid’s bow, the center of your chin, and the inner corners of your eyes to brighten up your face and add dimension. Using a highlighter brush and blending it into the target location is ideal.
Creating a Natural Look: Contour Like a Pro: Sculpting Your Face for a Defined Look in 5 Easy Steps
To create a natural look, focus on soft, subtle shadows and highlights. Use a light hand when applying product and blend everything seamlessly into your skin. Avoid harsh lines and overly dramatic effects.
Remember that the type of brush you selected can make a difference in blending the makeup into the face. Angled brushes are primarily used to assist in applying the makeup. For actual blending, a kabuki brush may be more desired to successfully pull the shadow makeup together.
By focusing on these simple techniques, your face will successfully Contour Like a Pro: Sculpting Your Face for a Defined Look in 5 Easy Steps.
Maintaining Your Contoured Look Throughout the Day
To keep your contoured look fresh all day, consider these tips. These practices will help prevent fading and ensure your makeup looks flawless from morning to night. These suggestions may help to fix any prior mistakes as you master how to Contour Like a Pro: Sculpting Your Face for a Defined Look in 5 Easy Steps.
- Set Your Makeup: Use a setting spray to lock in your makeup and prevent it from fading throughout the day. Choose a spray that is suitable for your skin type.
- Touch-Ups: Carry a small powder compact with you for touch-ups as needed. Focus on areas that tend to get oily or fade quickly.
- Primer: Start with a good makeup primer to create a smooth base that helps your makeup adhere better and last longer.
Also consider the seasons. In the summer months, makeup can get oily and run faster than is ideal. Choose products that prevent this from happening. Look for setting sprays and cream makeup foundations and contours that stay in place for long periods.
Overall, with the right tools, products, and knowledge, anyone can successfully learn how to Contour Like a Pro: Sculpting Your Face for a Defined Look in 5 Easy Steps! Remember, the key is to take your time, practice, and have fun with it.
| Key Point | Brief Description |
|---|---|
| ✨ Product Selection | Choose matte shades 1-2 tones darker than skin for natural shadows. |
| 🖌️ Blending Technique | Blend edges well for a seamless finish; avoid harsh lines. |
| 💡 Highlight Placement | Apply highlighter to high points for dimension. |
| ✔️ Maintenance | Set makeup with spray; touch up as needed. |
Frequently Asked Questions (FAQ)
Powder contour kits or sticks are usually best, due to their ease of application and simple blending techniques. They are affordable and a great option for getting started! Just be prepared to work with a lighter application, as it is easier to build than to remove.
The best way to choose a great shade is by finding a shade that is only slightly darker than your natural skin tone. Colors that are too dark or too light may not assist in your goal and create a harsh or unnatural look to the skin.
While bronzers and contour products are similar, bronzer often contains shimmer, which is counter to what contour makeup is intended to do. Because of their differences, it’s better to stick with dedicated contour products for creating the shadow effects as you Contour Like a Pro: Sculpting Your Face for a Defined Look in 5 Easy Steps.
Regularly cleaning your brushes keeps them working well and prevents makeup buildup, which can transfer to your face. It’s generally recommended to clean your contour brushes at least once a week, especially if you use them daily.
Cream contour products usually leave a more intense and longer-lasting finish, whereas powder contour products are easier to blend. Cream contour is also better suited for drier skin tones, whereas powder is better for more oily skin types as you Contour Like a Pro: Sculpting Your Face for a Defined Look in 5 Easy Steps.
Conclusion
Learning how to Contour Like a Pro: Sculpting Your Face for a Defined Look in 5 Easy Steps doesn’t have to be complicated. By following these simple steps and tips, you can enhance your features and achieve a defined, sculpted look. Remember to blend well and practice to perfect your technique.
With the right products and a bit of practice, you’ll be contouring like a professional makeup artist in no time. So go ahead, give it a try, and discover the transformative power of contouring!


